
A coordinated crochet cover can change the character of a bed or sofa. This collection brings together floral squares, geometric panels, soft lace and striped textures. The original interpretations below explain how to make usable throws and decorative covers while retaining the palette and broad mood of each reference.
US crochet terms and working rules
ch = chain; sl st = slip stitch; sc = single crochet; hdc = half double crochet; dc = double crochet; inc = 2 stitches in one stitch; sc2tog = single crochet two stitches together; st(s) = stitch(es); sp = space; RS = right side. A magic ring is an adjustable yarn loop. Numbers in brackets give end-of-round or end-of-row counts. Repeat instructions between parentheses the stated number of times.
Unless a step explicitly says otherwise, beginning chains do not count as stitches. For dc rounds, ch 2 to reach height, then work the first dc into the first stitch; join to the first real dc. For sc rounds, ch 1 and join to the first sc. For flat sc rows, ch 1 and turn. Flat dc rows explicitly use ch 3 as the first counted dc. Do not work into joining slip stitches. Change color by completing the last yarn-over of the preceding stitch with the new yarn.
To work sc2tog: insert hook into the next stitch and draw up a loop, repeat in the following stitch, yarn over and draw through all three loops. For a surface slip stitch, bring the yarn up from behind the fabric, insert the hook into the next chosen gap and pull the new loop through the loop already on the hook. Keep these stitches loose.
1. Emerald Daisy Bedspread
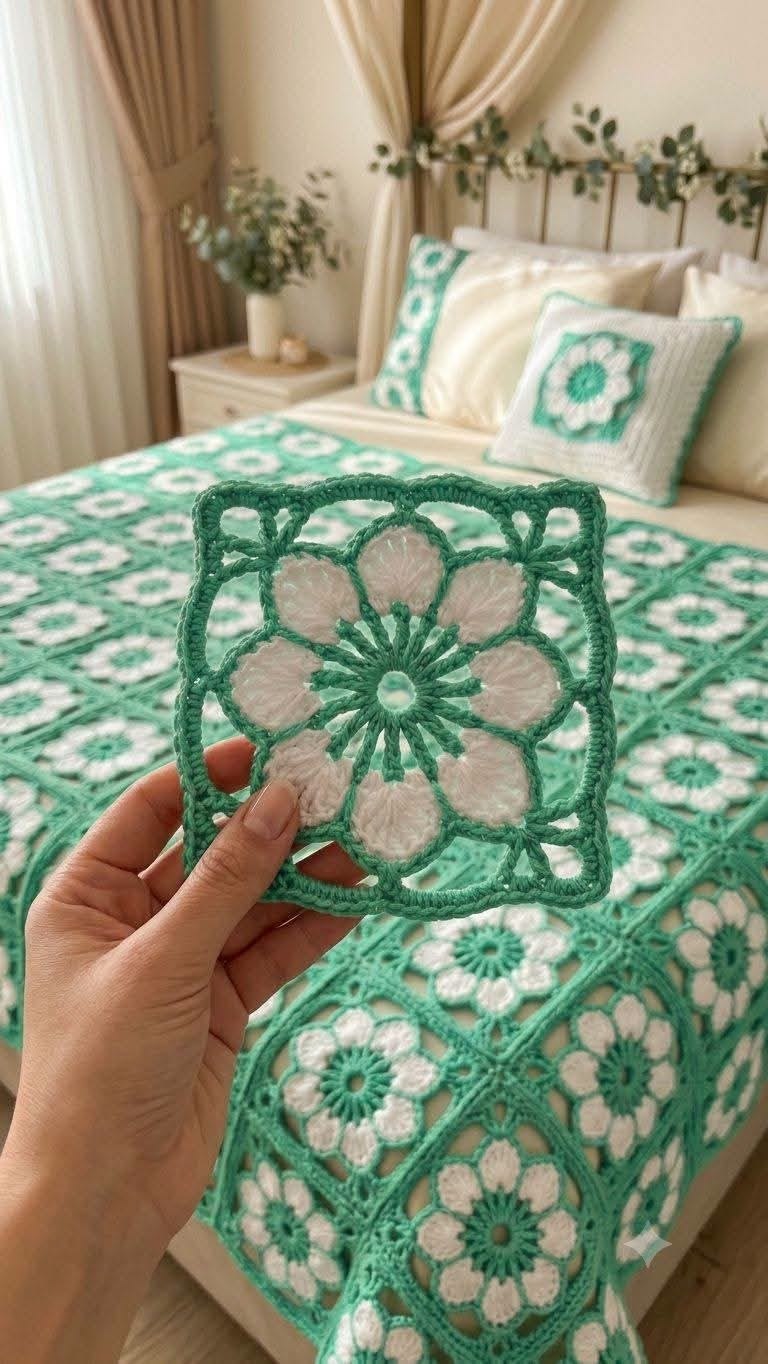
Color and texture inspiration: emerald, mint and cream. Use mint centers, cream petals and emerald framing; make two matching 4 × 4-square cushion fronts.
Materials, gauge and size
DK or light-worsted yarn, approximately 1,200–2,500 g for the throw body; optional pillow fronts need extra yarn. Colors: emerald, mint and cream. These are planning estimates, not measured yarn requirements. Use the yarn label’s meterage and a weighed swatch to buy enough of each color.
Hook: 4 mm. Also use a yarn needle, scissors, stitch markers, measuring tape and rustproof blocking pins.
Gauge and size: one blocked five-round square should measure about 12 × 12 cm; adjust hook or yarn to reach that size.
Project plan
Make 120 squares in a 10 × 12 arrangement for a 120 × 144 cm body at 12 cm per square.
Floral square — make the quantity in the layout
- Round 1: Make a magic ring. Ch 1 (does not count), work 12 sc into the ring; tighten and join with a sl st to the first sc. [12 sc]
- Round 2: Join the petal color. In each sc work (sc, ch 3, dc, ch 3, sl st), then move directly to the next sc. Join to the first sc. [12 petals; 12 sc, 12 dc, 24 ch-3 spaces, 12 sl sts] Do not work into the petal stitches next round.
- Round 3: With the framing color behind the petals, work 1 sc around each Round-1 sc post, ch 3 after each sc; join. [12 sc, 12 ch-3 spaces] Keep all petals on the right side.
- Round 4: Sl st into the first ch-3 space. In that space work (3 dc, ch 2, 3 dc); work 3 dc in each of the next two spaces. Repeat that sequence three more times; join. [48 dc, four ch-2 corners; four 3-dc groups per side when corner halves are included]
- Round 5: Ch 1, sc in each dc; in each corner space work (sc, ch 2, sc); join. [56 sc, four ch-2 corners; 14 sc along each side between corner spaces] Fasten off. Block to a square without stretching the petals.
Layout, joining and finishing
Make 120 squares in a 10 × 12 arrangement for a 120 × 144 cm body at 12 cm per square.
- Lay out all squares with their right sides up. Count the full grid before joining. Keep each square oriented the same way unless a deliberate rotated color arrangement is planned.
- With right sides facing, whipstitch corresponding outer loops along each side, matching all edge stitches and both corner spaces. Keep the seam relaxed. Join every row horizontally, then join the rows vertically. At a four-square intersection, take one securing stitch through the corner loops without pulling a hole open.
- For each optional cushion front, join 16 squares in a 4 × 4 grid. Sew the blocked front onto a washable fabric cushion cover with small running stitches around all four edges; keep its existing closure accessible. Use a fabric backing rather than assuming an open crochet front will hold stuffing.
- Join the border color in a corner. Sc in every edge stitch; work (sc, ch 2, sc) in each outside corner. At a seam, work through both adjoining loops once, without doubling up stitches.
- Work one more sc round, keeping each outside corner as (sc, ch 2, sc). For an optional shell round, along each straight side repeat: skip 1 sc, 5 dc in next sc, skip 1 sc, sl st in next sc. Use plain sc for any one to three leftover stitches before a corner; work (sc, ch 2, sc) in the corner. Do not force a shell across a seam or corner.
- Weave each end in three directions for at least 7 cm. Wet-block flat to the planned measurements, allow to dry completely, then check all seams. Wash a sample first; follow the yarn label.
Fit check: the stated body is a throw-size interpretation, not a promise of full bed or sofa coverage. To enlarge, measure the required width and length, divide each by the blocked motif width, round each result up, and multiply those two motif counts. Recalculate yarn from your swatch.
2. Sage Floral Granny-Square Bed Cover
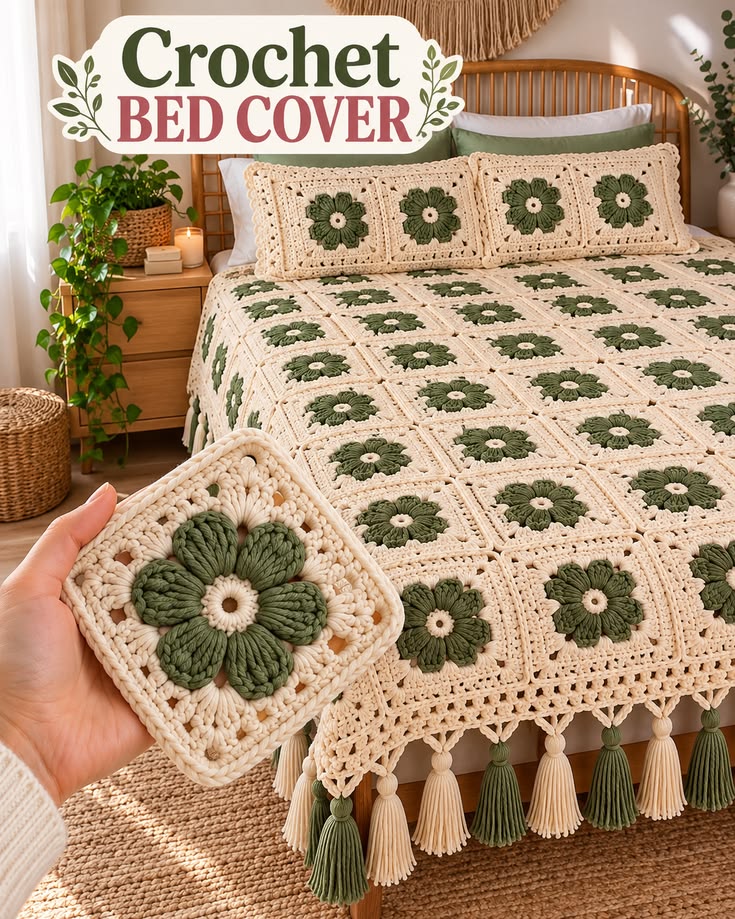
Color and texture inspiration: sage, cream and warm white. Use sage centers and petals with cream outer rounds. Add tassels only to the foot edge.
Materials, gauge and size
DK or light-worsted yarn, approximately 1,200–2,500 g for the throw body; optional pillow fronts need extra yarn. Colors: sage, cream and warm white. These are planning estimates, not measured yarn requirements. Use the yarn label’s meterage and a weighed swatch to buy enough of each color.
Hook: 4 mm. Also use a yarn needle, scissors, stitch markers, measuring tape and rustproof blocking pins.
Gauge and size: one blocked five-round square should measure about 12 × 12 cm; adjust hook or yarn to reach that size.
Project plan
Make 120 squares; arrange 10 across × 12 down. At 12 cm per square, the joined body is approximately 120 × 144 cm before edging.
Floral square — make the quantity in the layout
- Round 1: Make a magic ring. Ch 1 (does not count), work 12 sc into the ring; tighten and join with a sl st to the first sc. [12 sc]
- Round 2: Join the petal color. In each sc work (sc, ch 3, dc, ch 3, sl st), then move directly to the next sc. Join to the first sc. [12 petals; 12 sc, 12 dc, 24 ch-3 spaces, 12 sl sts] Do not work into the petal stitches next round.
- Round 3: With the framing color behind the petals, work 1 sc around each Round-1 sc post, ch 3 after each sc; join. [12 sc, 12 ch-3 spaces] Keep all petals on the right side.
- Round 4: Sl st into the first ch-3 space. In that space work (3 dc, ch 2, 3 dc); work 3 dc in each of the next two spaces. Repeat that sequence three more times; join. [48 dc, four ch-2 corners; four 3-dc groups per side when corner halves are included]
- Round 5: Ch 1, sc in each dc; in each corner space work (sc, ch 2, sc); join. [56 sc, four ch-2 corners; 14 sc along each side between corner spaces] Fasten off. Block to a square without stretching the petals.
Layout, joining and finishing
Make 120 squares; arrange 10 across × 12 down. At 12 cm per square, the joined body is approximately 120 × 144 cm before edging.
- Lay out all squares with their right sides up. Count the full grid before joining. Keep each square oriented the same way unless a deliberate rotated color arrangement is planned.
- With right sides facing, whipstitch corresponding outer loops along each side, matching all edge stitches and both corner spaces. Keep the seam relaxed. Join every row horizontally, then join the rows vertically. At a four-square intersection, take one securing stitch through the corner loops without pulling a hole open.
- For each optional cushion front, join 16 squares in a 4 × 4 grid. Sew the blocked front onto a washable fabric cushion cover with small running stitches around all four edges; keep its existing closure accessible. Use a fabric backing rather than assuming an open crochet front will hold stuffing.
- Join the border color in a corner. Sc in every edge stitch; work (sc, ch 2, sc) in each outside corner. At a seam, work through both adjoining loops once, without doubling up stitches.
- Work one more sc round, keeping each outside corner as (sc, ch 2, sc). For an optional shell round, along each straight side repeat: skip 1 sc, 5 dc in next sc, skip 1 sc, sl st in next sc. Use plain sc for any one to three leftover stitches before a corner; work (sc, ch 2, sc) in the corner. Do not force a shell across a seam or corner.
- Weave each end in three directions for at least 7 cm. Wet-block flat to the planned measurements, allow to dry completely, then check all seams. Wash a sample first; follow the yarn label.
Optional tassels: cut 12 strands of yarn 20 cm long per tassel. Fold together through a foot-edge seam, wrap the neck and trim to 8 cm. Make one at each of the 11 grid intersections along that edge.
3. Golden Daisy Sofa Cover
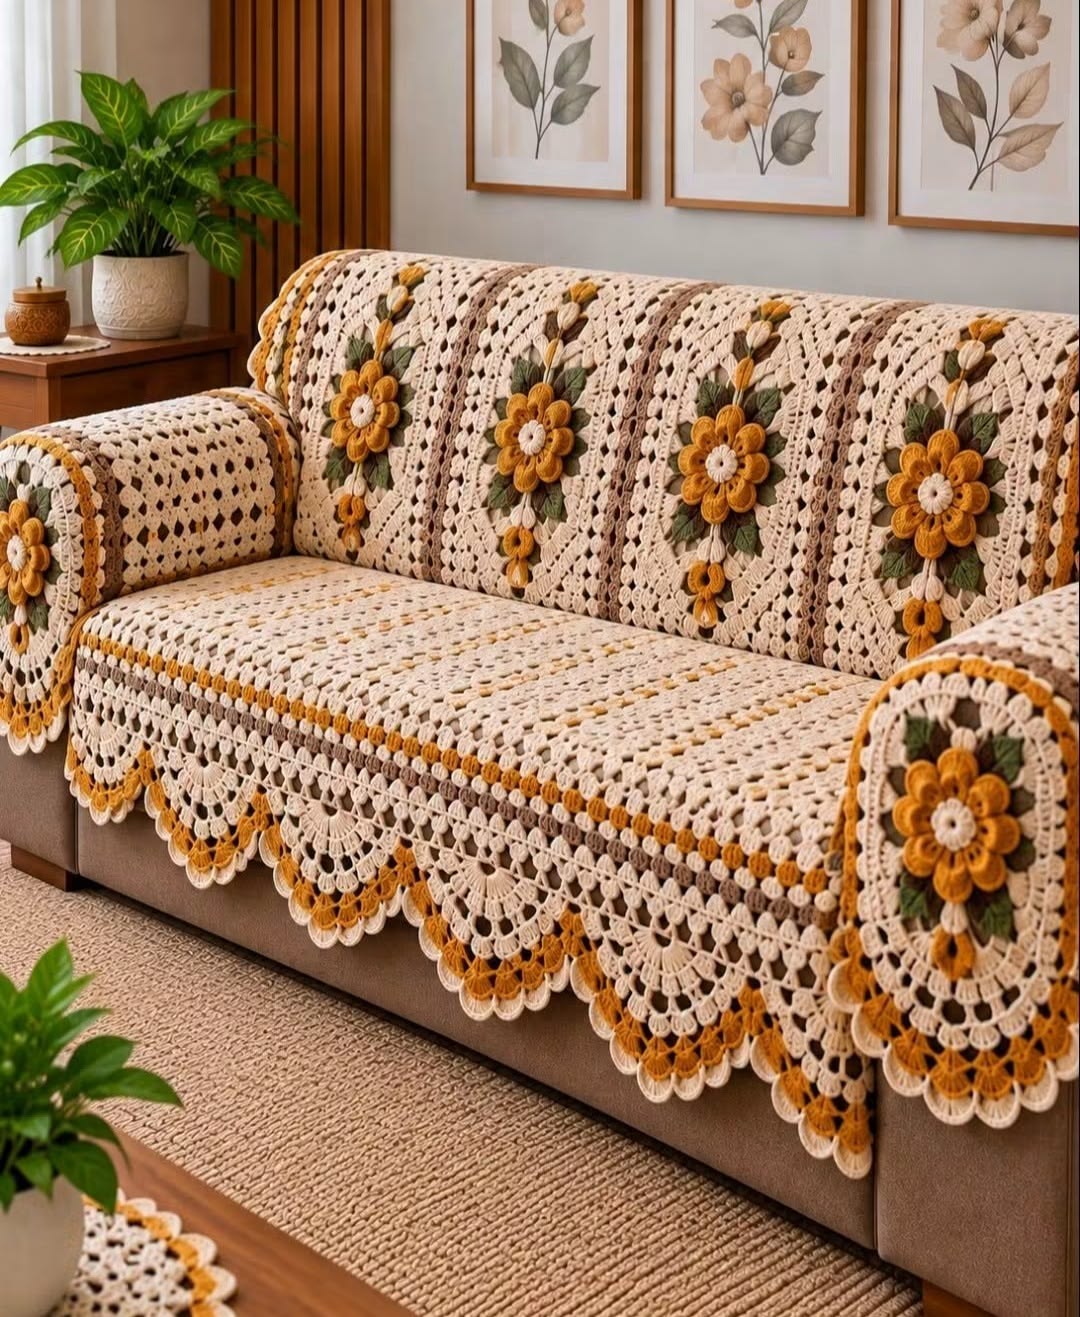
Color and texture inspiration: gold, cream and tan. Use gold centers and cream petals; deepen the border with tan.
Materials, gauge and size
DK or light-worsted yarn, approximately 1,200–2,500 g for the throw body; optional pillow fronts need extra yarn. Colors: gold, cream and tan. These are planning estimates, not measured yarn requirements. Use the yarn label’s meterage and a weighed swatch to buy enough of each color.
Hook: 4 mm. Also use a yarn needle, scissors, stitch markers, measuring tape and rustproof blocking pins.
Gauge and size: one blocked five-round square should measure about 12 × 12 cm; adjust hook or yarn to reach that size.
Project plan
Make 96 squares in an 8 × 12 layout for a 96 × 144 cm throw. Add two separate 4 × 4-square cushion fronts if wanted.
Floral square — make the quantity in the layout
- Round 1: Make a magic ring. Ch 1 (does not count), work 12 sc into the ring; tighten and join with a sl st to the first sc. [12 sc]
- Round 2: Join the petal color. In each sc work (sc, ch 3, dc, ch 3, sl st), then move directly to the next sc. Join to the first sc. [12 petals; 12 sc, 12 dc, 24 ch-3 spaces, 12 sl sts] Do not work into the petal stitches next round.
- Round 3: With the framing color behind the petals, work 1 sc around each Round-1 sc post, ch 3 after each sc; join. [12 sc, 12 ch-3 spaces] Keep all petals on the right side.
- Round 4: Sl st into the first ch-3 space. In that space work (3 dc, ch 2, 3 dc); work 3 dc in each of the next two spaces. Repeat that sequence three more times; join. [48 dc, four ch-2 corners; four 3-dc groups per side when corner halves are included]
- Round 5: Ch 1, sc in each dc; in each corner space work (sc, ch 2, sc); join. [56 sc, four ch-2 corners; 14 sc along each side between corner spaces] Fasten off. Block to a square without stretching the petals.
Layout, joining and finishing
Make 96 squares in an 8 × 12 layout for a 96 × 144 cm throw. Add two separate 4 × 4-square cushion fronts if wanted.
- Lay out all squares with their right sides up. Count the full grid before joining. Keep each square oriented the same way unless a deliberate rotated color arrangement is planned.
- With right sides facing, whipstitch corresponding outer loops along each side, matching all edge stitches and both corner spaces. Keep the seam relaxed. Join every row horizontally, then join the rows vertically. At a four-square intersection, take one securing stitch through the corner loops without pulling a hole open.
- For each optional cushion front, join 16 squares in a 4 × 4 grid. Sew the blocked front onto a washable fabric cushion cover with small running stitches around all four edges; keep its existing closure accessible. Use a fabric backing rather than assuming an open crochet front will hold stuffing.
- Join the border color in a corner. Sc in every edge stitch; work (sc, ch 2, sc) in each outside corner. At a seam, work through both adjoining loops once, without doubling up stitches.
- Work one more sc round, keeping each outside corner as (sc, ch 2, sc). For an optional shell round, along each straight side repeat: skip 1 sc, 5 dc in next sc, skip 1 sc, sl st in next sc. Use plain sc for any one to three leftover stitches before a corner; work (sc, ch 2, sc) in the corner. Do not force a shell across a seam or corner.
- Weave each end in three directions for at least 7 cm. Wet-block flat to the planned measurements, allow to dry completely, then check all seams. Wash a sample first; follow the yarn label.
Fit check: the stated body is a throw-size interpretation, not a promise of full bed or sofa coverage. To enlarge, measure the required width and length, divide each by the blocked motif width, round each result up, and multiply those two motif counts. Recalculate yarn from your swatch.
4. Olive Geometric Star Throw
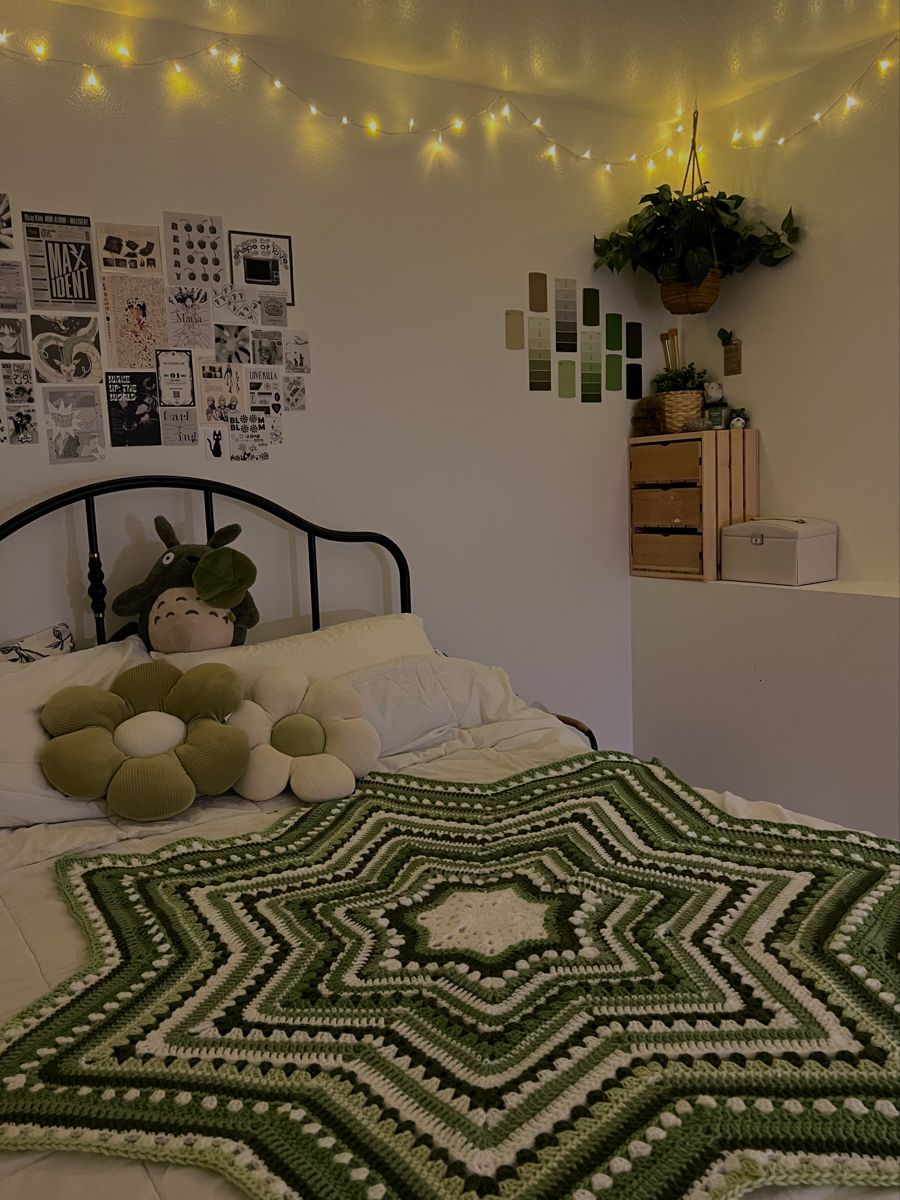
Color and texture inspiration: olive, cream and charcoal. This substitutes a regular 12-point ripple for the angular geometry of the reference.
Materials, gauge and size
DK or light-worsted yarn, approximately 1,200–2,500 g for the throw body; optional pillow fronts need extra yarn. Colors: olive, cream and charcoal. These are planning estimates, not measured yarn requirements. Use the yarn label’s meterage and a weighed swatch to buy enough of each color.
Hook: 4 mm. Also use a yarn needle, scissors, stitch markers, measuring tape and rustproof blocking pins.
Gauge and size: begin with a 10 cm washed swatch. Target approximately 16 sc × 18 rows or 16 dc × 9 rows per 10 cm, according to the main fabric. Motif dimensions depend on tension; lay out and measure the blocked units before joining.
Project plan
Work one 12-point ripple star to 30 rounds; stop earlier for a table accent or extend in the established repeat for a throw.
Twelve-point ripple star
- Round 1: Into a magic ring work 12 dc; join. [12 dc]
- Round 2: Into each stitch work (dc, ch 2, dc); join. [24 dc, 12 ch-2 points]
- Round 3: Sl st into the first point. In each ch-2 point work (2 dc, ch 2, 2 dc); skip both dc between points. [48 dc, 12 points; each point has two dc on each side]
- Round 4: From the first point work (2 dc, ch 2, 2 dc). Dc in the next stitch, skip the two stitches at the valley (the last stitch before and the first after the valley), dc in next stitch. Repeat around. [72 dc, 12 points; three dc per side of each point]
- Rounds 5–30: At each point work (2 dc, ch 2, 2 dc); dc along each slope, skipping only the two central valley stitches between points. Each round adds 24 dc. Round r has 24 × (r − 1) dc, so Round 5 has 96 and Round 30 has 696 dc, plus 12 ch-2 points. Each slope gains one dc per round. Mark all 12 valleys before starting a round.
- Color plan: repeat two rounds olive, one cream, one charcoal. For the final edge, sc in every dc, (sc, ch 2, sc) at each point, and skip the two central valley stitches. Weave ends and block all 12 points evenly.
- Check flatness after every four rounds. This mathematically regular ripple still needs a washed swatch; tension may require hook adjustment. Do not claim a finished diameter without measuring your own fabric.
5. Chocolate-and-Cream Floral Sofa Throw
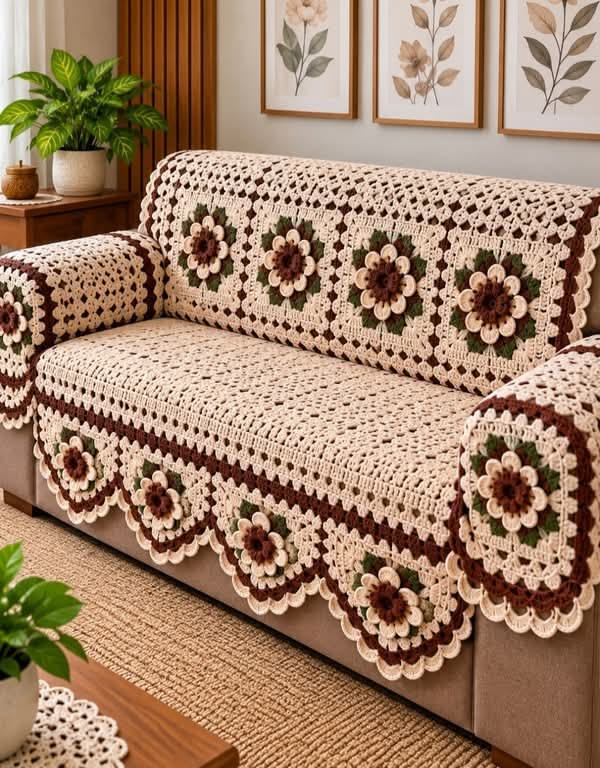
Color and texture inspiration: cream, cocoa and espresso. Use dark centers, cream petals and cocoa frames. Treat this as a draped throw; measure the sofa before enlarging.
Materials, gauge and size
DK or light-worsted yarn, approximately 1,200–2,500 g for the throw body; optional pillow fronts need extra yarn. Colors: cream, cocoa and espresso. These are planning estimates, not measured yarn requirements. Use the yarn label’s meterage and a weighed swatch to buy enough of each color.
Hook: 4 mm. Also use a yarn needle, scissors, stitch markers, measuring tape and rustproof blocking pins.
Gauge and size: one blocked five-round square should measure about 12 × 12 cm; adjust hook or yarn to reach that size.
Project plan
Make 96 squares; join 8 across × 12 down for a 96 × 144 cm body at 12 cm per square. Make two 4 × 4-square cushion fronts separately.
Floral square — make the quantity in the layout
- Round 1: Make a magic ring. Ch 1 (does not count), work 12 sc into the ring; tighten and join with a sl st to the first sc. [12 sc]
- Round 2: Join the petal color. In each sc work (sc, ch 3, dc, ch 3, sl st), then move directly to the next sc. Join to the first sc. [12 petals; 12 sc, 12 dc, 24 ch-3 spaces, 12 sl sts] Do not work into the petal stitches next round.
- Round 3: With the framing color behind the petals, work 1 sc around each Round-1 sc post, ch 3 after each sc; join. [12 sc, 12 ch-3 spaces] Keep all petals on the right side.
- Round 4: Sl st into the first ch-3 space. In that space work (3 dc, ch 2, 3 dc); work 3 dc in each of the next two spaces. Repeat that sequence three more times; join. [48 dc, four ch-2 corners; four 3-dc groups per side when corner halves are included]
- Round 5: Ch 1, sc in each dc; in each corner space work (sc, ch 2, sc); join. [56 sc, four ch-2 corners; 14 sc along each side between corner spaces] Fasten off. Block to a square without stretching the petals.
Layout, joining and finishing
Make 96 squares; join 8 across × 12 down for a 96 × 144 cm body at 12 cm per square. Make two 4 × 4-square cushion fronts separately.
- Lay out all squares with their right sides up. Count the full grid before joining. Keep each square oriented the same way unless a deliberate rotated color arrangement is planned.
- With right sides facing, whipstitch corresponding outer loops along each side, matching all edge stitches and both corner spaces. Keep the seam relaxed. Join every row horizontally, then join the rows vertically. At a four-square intersection, take one securing stitch through the corner loops without pulling a hole open.
- For each optional cushion front, join 16 squares in a 4 × 4 grid. Sew the blocked front onto a washable fabric cushion cover with small running stitches around all four edges; keep its existing closure accessible. Use a fabric backing rather than assuming an open crochet front will hold stuffing.
- Join the border color in a corner. Sc in every edge stitch; work (sc, ch 2, sc) in each outside corner. At a seam, work through both adjoining loops once, without doubling up stitches.
- Work one more sc round, keeping each outside corner as (sc, ch 2, sc). For an optional shell round, along each straight side repeat: skip 1 sc, 5 dc in next sc, skip 1 sc, sl st in next sc. Use plain sc for any one to three leftover stitches before a corner; work (sc, ch 2, sc) in the corner. Do not force a shell across a seam or corner.
- Weave each end in three directions for at least 7 cm. Wet-block flat to the planned measurements, allow to dry completely, then check all seams. Wash a sample first; follow the yarn label.
Fit check: the stated body is a throw-size interpretation, not a promise of full bed or sofa coverage. To enlarge, measure the required width and length, divide each by the blocked motif width, round each result up, and multiply those two motif counts. Recalculate yarn from your swatch.
6. Mocha Diamond-Motif Bed Cover
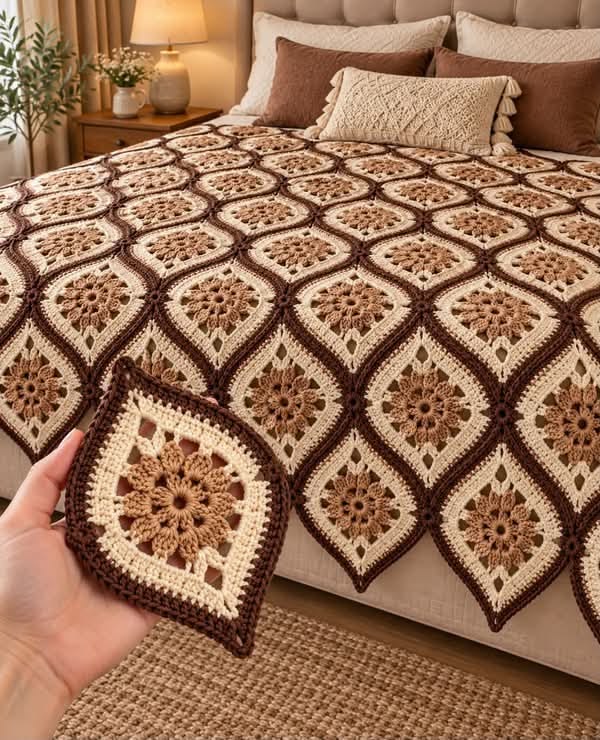
Color and texture inspiration: cream, coffee and dark brown. At 12 cm per square, the body is 120 × 144 cm. A square grid with contrasting frames suggests the diamond effect without reproducing the exact reference.
Materials, gauge and size
DK or light-worsted yarn, approximately 1,200–2,500 g for the throw body; optional pillow fronts need extra yarn. Colors: cream, coffee and dark brown. These are planning estimates, not measured yarn requirements. Use the yarn label’s meterage and a weighed swatch to buy enough of each color.
Hook: 4 mm. Also use a yarn needle, scissors, stitch markers, measuring tape and rustproof blocking pins.
Gauge and size: one blocked five-round square should measure about 12 × 12 cm; adjust hook or yarn to reach that size.
Project plan
Make 120 framed squares and join 10 × 12. Rotate the entire grid 45 degrees only for styling; do not cut crochet fabric.
Framed square — make the quantity in the layout
- Round 1: In a magic ring work (3 dc, ch 2) four times; join to the first dc. [12 dc, four ch-2 corners]
- Round 2: Join the second color in a corner. Work (2 dc, ch 2, 2 dc) in each corner and 1 dc in each of the three side stitches; join. [28 dc, four ch-2 corners; seven dc per side]
- Round 3: With the third color, work 1 dc in each dc and (2 dc, ch 2, 2 dc) in each corner; join. [44 dc; 11 per side]
- Round 4: Repeat Round 3. [60 dc; 15 per side]
- Round 5: Repeat Round 3. [76 dc; 19 per side] Block to approximately 12 cm; change hook size if necessary. Each contrasting frame creates a geometric outline.
Layout, joining and finishing
Make 120 framed squares and join 10 × 12. Rotate the entire grid 45 degrees only for styling; do not cut crochet fabric.
- Lay out all squares with their right sides up. Count the full grid before joining. Keep each square oriented the same way unless a deliberate rotated color arrangement is planned.
- With right sides facing, whipstitch corresponding outer loops along each side, matching all edge stitches and both corner spaces. Keep the seam relaxed. Join every row horizontally, then join the rows vertically. At a four-square intersection, take one securing stitch through the corner loops without pulling a hole open.
- For each optional cushion front, join 16 squares in a 4 × 4 grid. Sew the blocked front onto a washable fabric cushion cover with small running stitches around all four edges; keep its existing closure accessible. Use a fabric backing rather than assuming an open crochet front will hold stuffing.
- Join the border color in a corner. Sc in every edge stitch; work (sc, ch 2, sc) in each outside corner. At a seam, work through both adjoining loops once, without doubling up stitches.
- Work one more sc round, keeping each outside corner as (sc, ch 2, sc). For an optional shell round, along each straight side repeat: skip 1 sc, 5 dc in next sc, skip 1 sc, sl st in next sc. Use plain sc for any one to three leftover stitches before a corner; work (sc, ch 2, sc) in the corner. Do not force a shell across a seam or corner.
- Weave each end in three directions for at least 7 cm. Wet-block flat to the planned measurements, allow to dry completely, then check all seams. Wash a sample first; follow the yarn label.
Fit check: the stated body is a throw-size interpretation, not a promise of full bed or sofa coverage. To enlarge, measure the required width and length, divide each by the blocked motif width, round each result up, and multiply those two motif counts. Recalculate yarn from your swatch.
7. Navy Flower Bed Cover
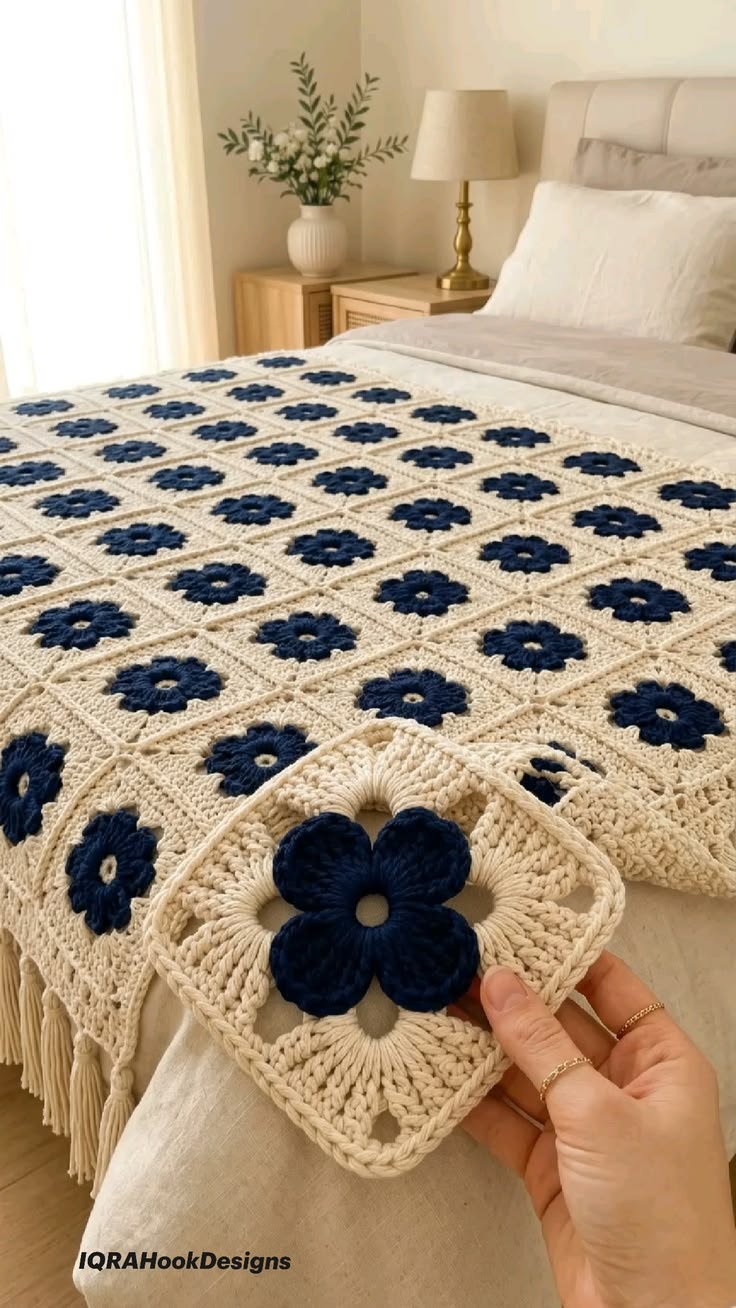
Color and texture inspiration: navy, cream and beige. Use navy petals with cream framing for a crisp scattered-flower effect.
Materials, gauge and size
DK or light-worsted yarn, approximately 1,200–2,500 g for the throw body; optional pillow fronts need extra yarn. Colors: navy, cream and beige. These are planning estimates, not measured yarn requirements. Use the yarn label’s meterage and a weighed swatch to buy enough of each color.
Hook: 4 mm. Also use a yarn needle, scissors, stitch markers, measuring tape and rustproof blocking pins.
Gauge and size: one blocked five-round square should measure about 12 × 12 cm; adjust hook or yarn to reach that size.
Project plan
Make 120 squares; arrange 10 × 12 for an approximately 120 × 144 cm body before edging.
Floral square — make the quantity in the layout
- Round 1: Make a magic ring. Ch 1 (does not count), work 12 sc into the ring; tighten and join with a sl st to the first sc. [12 sc]
- Round 2: Join the petal color. In each sc work (sc, ch 3, dc, ch 3, sl st), then move directly to the next sc. Join to the first sc. [12 petals; 12 sc, 12 dc, 24 ch-3 spaces, 12 sl sts] Do not work into the petal stitches next round.
- Round 3: With the framing color behind the petals, work 1 sc around each Round-1 sc post, ch 3 after each sc; join. [12 sc, 12 ch-3 spaces] Keep all petals on the right side.
- Round 4: Sl st into the first ch-3 space. In that space work (3 dc, ch 2, 3 dc); work 3 dc in each of the next two spaces. Repeat that sequence three more times; join. [48 dc, four ch-2 corners; four 3-dc groups per side when corner halves are included]
- Round 5: Ch 1, sc in each dc; in each corner space work (sc, ch 2, sc); join. [56 sc, four ch-2 corners; 14 sc along each side between corner spaces] Fasten off. Block to a square without stretching the petals.
Layout, joining and finishing
Make 120 squares; arrange 10 × 12 for an approximately 120 × 144 cm body before edging.
- Lay out all squares with their right sides up. Count the full grid before joining. Keep each square oriented the same way unless a deliberate rotated color arrangement is planned.
- With right sides facing, whipstitch corresponding outer loops along each side, matching all edge stitches and both corner spaces. Keep the seam relaxed. Join every row horizontally, then join the rows vertically. At a four-square intersection, take one securing stitch through the corner loops without pulling a hole open.
- For each optional cushion front, join 16 squares in a 4 × 4 grid. Sew the blocked front onto a washable fabric cushion cover with small running stitches around all four edges; keep its existing closure accessible. Use a fabric backing rather than assuming an open crochet front will hold stuffing.
- Join the border color in a corner. Sc in every edge stitch; work (sc, ch 2, sc) in each outside corner. At a seam, work through both adjoining loops once, without doubling up stitches.
- Work one more sc round, keeping each outside corner as (sc, ch 2, sc). For an optional shell round, along each straight side repeat: skip 1 sc, 5 dc in next sc, skip 1 sc, sl st in next sc. Use plain sc for any one to three leftover stitches before a corner; work (sc, ch 2, sc) in the corner. Do not force a shell across a seam or corner.
- Weave each end in three directions for at least 7 cm. Wet-block flat to the planned measurements, allow to dry completely, then check all seams. Wash a sample first; follow the yarn label.
Fit check: the stated body is a throw-size interpretation, not a promise of full bed or sofa coverage. To enlarge, measure the required width and length, divide each by the blocked motif width, round each result up, and multiply those two motif counts. Recalculate yarn from your swatch.
8. Cream and Cocoa Floral Sofa Drape
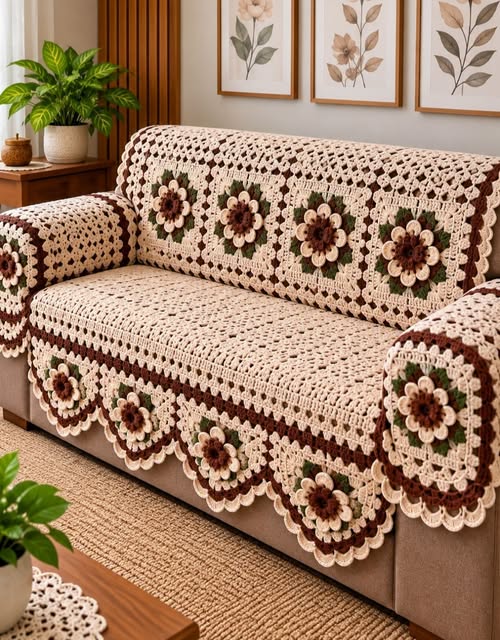
Color and texture inspiration: ivory, light cocoa and dark brown. A related reference also appears in this collection. This version uses a shorter body and a narrower border; the photo remains a separate inspiration entry.
Materials, gauge and size
DK or light-worsted yarn, approximately 1,200–2,500 g for the throw body; optional pillow fronts need extra yarn. Colors: ivory, light cocoa and dark brown. These are planning estimates, not measured yarn requirements. Use the yarn label’s meterage and a weighed swatch to buy enough of each color.
Hook: 4 mm. Also use a yarn needle, scissors, stitch markers, measuring tape and rustproof blocking pins.
Gauge and size: one blocked five-round square should measure about 12 × 12 cm; adjust hook or yarn to reach that size.
Project plan
Make 80 squares; join 8 × 10 for a 96 × 120 cm body at 12 cm per square.
Floral square — make the quantity in the layout
- Round 1: Make a magic ring. Ch 1 (does not count), work 12 sc into the ring; tighten and join with a sl st to the first sc. [12 sc]
- Round 2: Join the petal color. In each sc work (sc, ch 3, dc, ch 3, sl st), then move directly to the next sc. Join to the first sc. [12 petals; 12 sc, 12 dc, 24 ch-3 spaces, 12 sl sts] Do not work into the petal stitches next round.
- Round 3: With the framing color behind the petals, work 1 sc around each Round-1 sc post, ch 3 after each sc; join. [12 sc, 12 ch-3 spaces] Keep all petals on the right side.
- Round 4: Sl st into the first ch-3 space. In that space work (3 dc, ch 2, 3 dc); work 3 dc in each of the next two spaces. Repeat that sequence three more times; join. [48 dc, four ch-2 corners; four 3-dc groups per side when corner halves are included]
- Round 5: Ch 1, sc in each dc; in each corner space work (sc, ch 2, sc); join. [56 sc, four ch-2 corners; 14 sc along each side between corner spaces] Fasten off. Block to a square without stretching the petals.
Layout, joining and finishing
Make 80 squares; join 8 × 10 for a 96 × 120 cm body at 12 cm per square.
- Lay out all squares with their right sides up. Count the full grid before joining. Keep each square oriented the same way unless a deliberate rotated color arrangement is planned.
- With right sides facing, whipstitch corresponding outer loops along each side, matching all edge stitches and both corner spaces. Keep the seam relaxed. Join every row horizontally, then join the rows vertically. At a four-square intersection, take one securing stitch through the corner loops without pulling a hole open.
- For each optional cushion front, join 16 squares in a 4 × 4 grid. Sew the blocked front onto a washable fabric cushion cover with small running stitches around all four edges; keep its existing closure accessible. Use a fabric backing rather than assuming an open crochet front will hold stuffing.
- Join the border color in a corner. Sc in every edge stitch; work (sc, ch 2, sc) in each outside corner. At a seam, work through both adjoining loops once, without doubling up stitches.
- Work one more sc round, keeping each outside corner as (sc, ch 2, sc). For an optional shell round, along each straight side repeat: skip 1 sc, 5 dc in next sc, skip 1 sc, sl st in next sc. Use plain sc for any one to three leftover stitches before a corner; work (sc, ch 2, sc) in the corner. Do not force a shell across a seam or corner.
- Weave each end in three directions for at least 7 cm. Wet-block flat to the planned measurements, allow to dry completely, then check all seams. Wash a sample first; follow the yarn label.
Fit check: the stated body is a throw-size interpretation, not a promise of full bed or sofa coverage. To enlarge, measure the required width and length, divide each by the blocked motif width, round each result up, and multiply those two motif counts. Recalculate yarn from your swatch.
9. Pink Tulip Garden Bed Cover
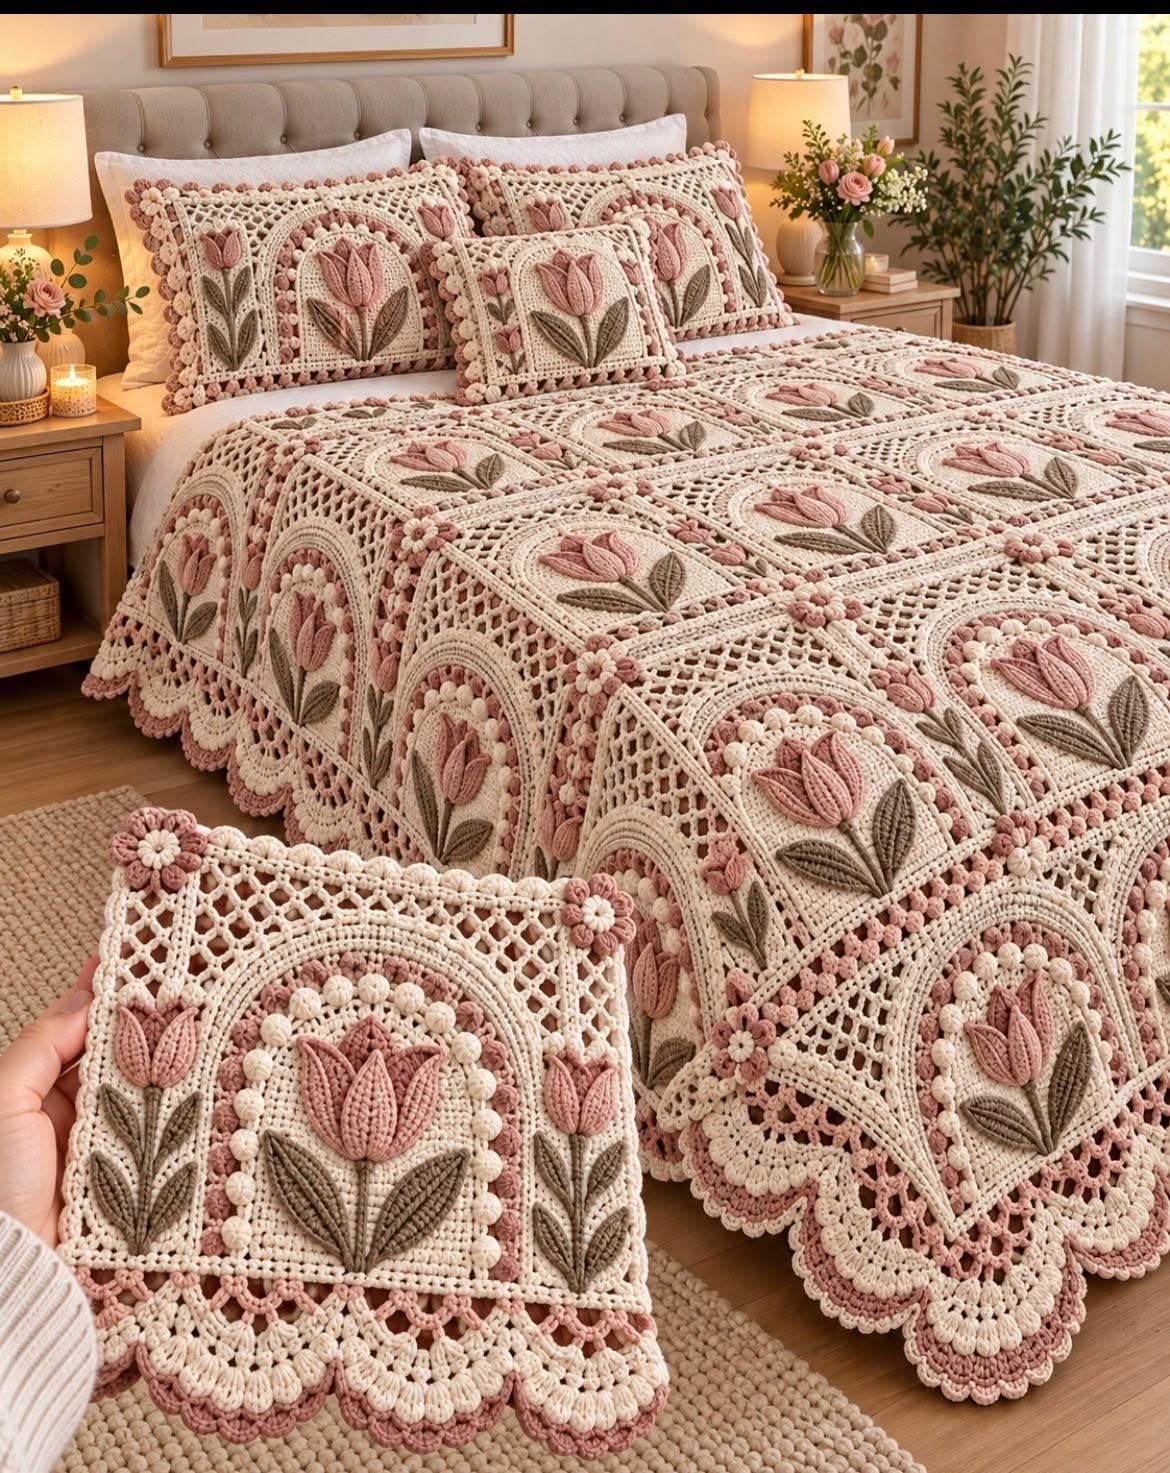
Color and texture inspiration: dusty pink, cream and pale sage. Use pink tulip petals, sage leaves and cream frames; make two optional 4 × 4-square pillow fronts. This is a simplified appliqué interpretation of the intricate photographed lace.
Materials, gauge and size
DK or light-worsted yarn, approximately 1,200–2,500 g for the throw body; optional pillow fronts need extra yarn. Colors: dusty pink, cream and pale sage. These are planning estimates, not measured yarn requirements. Use the yarn label’s meterage and a weighed swatch to buy enough of each color.
Hook: 4 mm. Also use a yarn needle, scissors, stitch markers, measuring tape and rustproof blocking pins.
Gauge and size: one blocked five-round square should measure about 12 × 12 cm; adjust hook or yarn to reach that size.
Project plan
Make 120 framed squares with tulip appliqués; join 10 × 12 for a 120 × 144 cm body at 12 cm per square.
Framed square — make the quantity in the layout
- Round 1: In a magic ring work (3 dc, ch 2) four times; join to the first dc. [12 dc, four ch-2 corners]
- Round 2: Join the second color in a corner. Work (2 dc, ch 2, 2 dc) in each corner and 1 dc in each of the three side stitches; join. [28 dc, four ch-2 corners; seven dc per side]
- Round 3: With the third color, work 1 dc in each dc and (2 dc, ch 2, 2 dc) in each corner; join. [44 dc; 11 per side]
- Round 4: Repeat Round 3. [60 dc; 15 per side]
- Round 5: Repeat Round 3. [76 dc; 19 per side] Block to approximately 12 cm; change hook size if necessary. Each contrasting frame creates a geometric outline.
Tulip appliqué for each square
- Use the framed-square instructions below for the ground: Round 1, (3 dc, ch 2) four times in a magic ring [12 dc]. Rounds 2–5, dc in each dc and (2 dc, ch 2, 2 dc) in each corner [28, 44, 60, 76 dc]. Keep the ground cream and block each square to 12 cm.
- Make three pink petals per square. For each petal, ch 7; starting in second chain work sc, hdc, dc, dc, hdc, 3 sc in last chain. Rotate; work hdc, dc, dc, hdc, sc into the unused chain loops; join. [13 stitches] Fasten off with a sewing tail.
- Make two sage leaves per square using the same 13-stitch petal instructions. Stem: ch 9 and sl st back down all eight chains [8 sl sts].
- Sew the stem upright on the lower half of the square. Arrange the two leaves diagonally at its base. Overlap three pink petals above the stem: one upright in the middle, two angled outward. Sew each petal perimeter down with small stitches. Keep the entire appliqué inside the square border.
Layout, joining and finishing
Make 120 framed squares with tulip appliqués; join 10 × 12 for a 120 × 144 cm body at 12 cm per square.
- Lay out all squares with their right sides up. Count the full grid before joining. Keep each square oriented the same way unless a deliberate rotated color arrangement is planned.
- With right sides facing, whipstitch corresponding outer loops along each side, matching all edge stitches and both corner spaces. Keep the seam relaxed. Join every row horizontally, then join the rows vertically. At a four-square intersection, take one securing stitch through the corner loops without pulling a hole open.
- For each optional cushion front, join 16 squares in a 4 × 4 grid. Sew the blocked front onto a washable fabric cushion cover with small running stitches around all four edges; keep its existing closure accessible. Use a fabric backing rather than assuming an open crochet front will hold stuffing.
- Join the border color in a corner. Sc in every edge stitch; work (sc, ch 2, sc) in each outside corner. At a seam, work through both adjoining loops once, without doubling up stitches.
- Work one more sc round, keeping each outside corner as (sc, ch 2, sc). For an optional shell round, along each straight side repeat: skip 1 sc, 5 dc in next sc, skip 1 sc, sl st in next sc. Use plain sc for any one to three leftover stitches before a corner; work (sc, ch 2, sc) in the corner. Do not force a shell across a seam or corner.
- Weave each end in three directions for at least 7 cm. Wet-block flat to the planned measurements, allow to dry completely, then check all seams. Wash a sample first; follow the yarn label.
Fit check: the stated body is a throw-size interpretation, not a promise of full bed or sofa coverage. To enlarge, measure the required width and length, divide each by the blocked motif width, round each result up, and multiply those two motif counts. Recalculate yarn from your swatch.
10. Lavender Floral Lace Bedspread
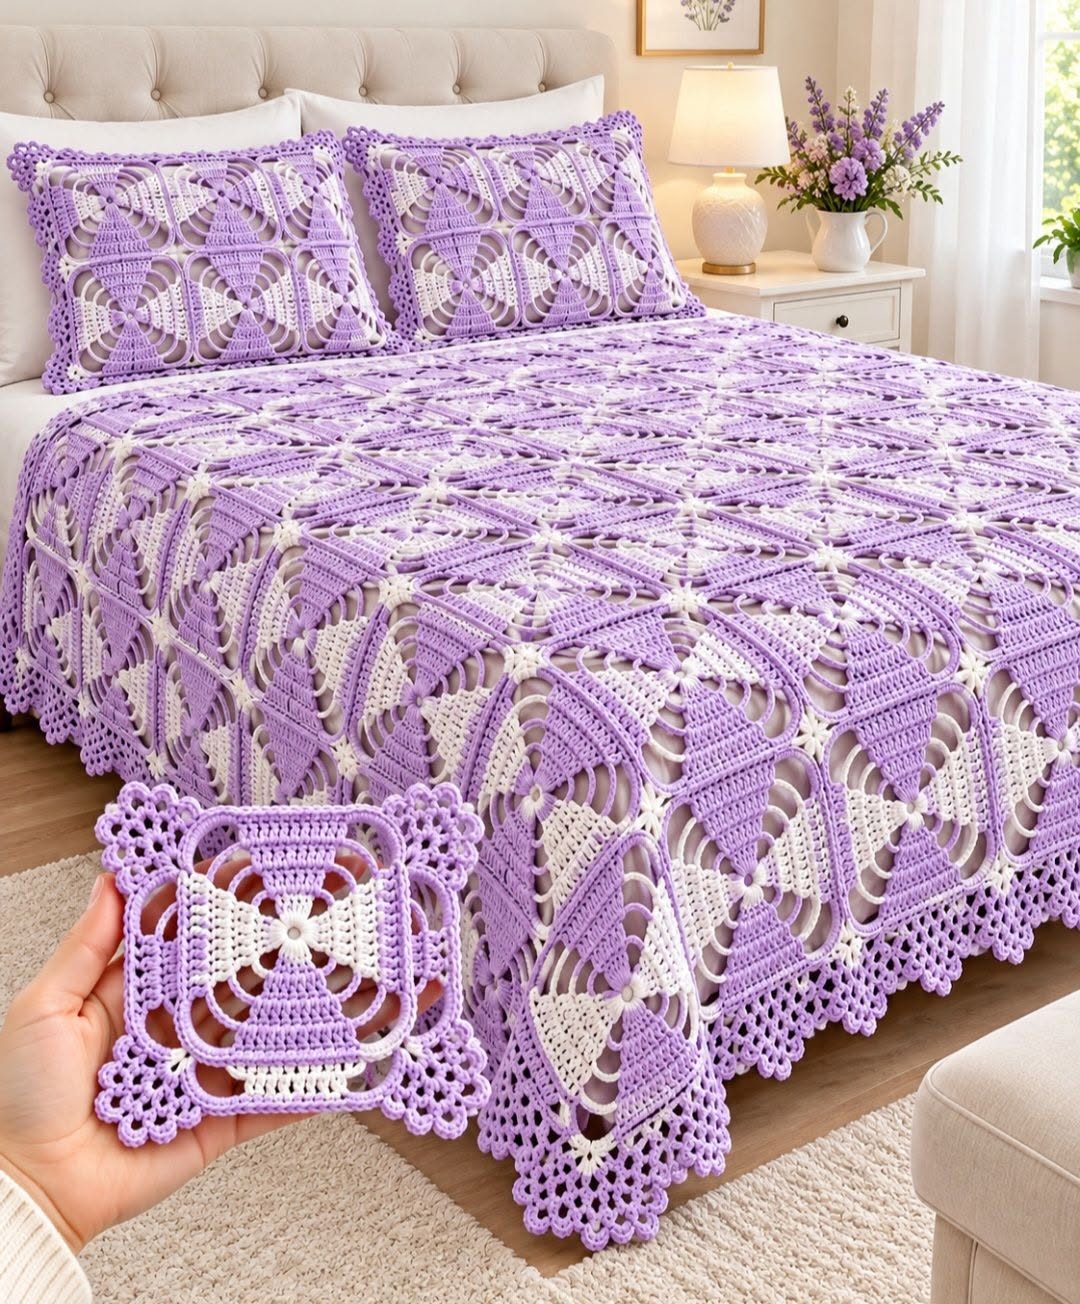
Color and texture inspiration: lavender, lilac and white. Choose lavender centers, white petals and lilac outer rounds. The open square interpretation differs from the photographed large floral lace.
Materials, gauge and size
DK or light-worsted yarn, approximately 1,200–2,500 g for the throw body; optional pillow fronts need extra yarn. Colors: lavender, lilac and white. These are planning estimates, not measured yarn requirements. Use the yarn label’s meterage and a weighed swatch to buy enough of each color.
Hook: 4 mm. Also use a yarn needle, scissors, stitch markers, measuring tape and rustproof blocking pins.
Gauge and size: one blocked five-round square should measure about 12 × 12 cm; adjust hook or yarn to reach that size.
Project plan
Make 120 squares; join 10 × 12. Add two matching 4 × 4-square cushion fronts.
Floral square — make the quantity in the layout
- Round 1: Make a magic ring. Ch 1 (does not count), work 12 sc into the ring; tighten and join with a sl st to the first sc. [12 sc]
- Round 2: Join the petal color. In each sc work (sc, ch 3, dc, ch 3, sl st), then move directly to the next sc. Join to the first sc. [12 petals; 12 sc, 12 dc, 24 ch-3 spaces, 12 sl sts] Do not work into the petal stitches next round.
- Round 3: With the framing color behind the petals, work 1 sc around each Round-1 sc post, ch 3 after each sc; join. [12 sc, 12 ch-3 spaces] Keep all petals on the right side.
- Round 4: Sl st into the first ch-3 space. In that space work (3 dc, ch 2, 3 dc); work 3 dc in each of the next two spaces. Repeat that sequence three more times; join. [48 dc, four ch-2 corners; four 3-dc groups per side when corner halves are included]
- Round 5: Ch 1, sc in each dc; in each corner space work (sc, ch 2, sc); join. [56 sc, four ch-2 corners; 14 sc along each side between corner spaces] Fasten off. Block to a square without stretching the petals.
Layout, joining and finishing
Make 120 squares; join 10 × 12. Add two matching 4 × 4-square cushion fronts.
- Lay out all squares with their right sides up. Count the full grid before joining. Keep each square oriented the same way unless a deliberate rotated color arrangement is planned.
- With right sides facing, whipstitch corresponding outer loops along each side, matching all edge stitches and both corner spaces. Keep the seam relaxed. Join every row horizontally, then join the rows vertically. At a four-square intersection, take one securing stitch through the corner loops without pulling a hole open.
- For each optional cushion front, join 16 squares in a 4 × 4 grid. Sew the blocked front onto a washable fabric cushion cover with small running stitches around all four edges; keep its existing closure accessible. Use a fabric backing rather than assuming an open crochet front will hold stuffing.
- Join the border color in a corner. Sc in every edge stitch; work (sc, ch 2, sc) in each outside corner. At a seam, work through both adjoining loops once, without doubling up stitches.
- Work one more sc round, keeping each outside corner as (sc, ch 2, sc). For an optional shell round, along each straight side repeat: skip 1 sc, 5 dc in next sc, skip 1 sc, sl st in next sc. Use plain sc for any one to three leftover stitches before a corner; work (sc, ch 2, sc) in the corner. Do not force a shell across a seam or corner.
- Weave each end in three directions for at least 7 cm. Wet-block flat to the planned measurements, allow to dry completely, then check all seams. Wash a sample first; follow the yarn label.
Fit check: the stated body is a throw-size interpretation, not a promise of full bed or sofa coverage. To enlarge, measure the required width and length, divide each by the blocked motif width, round each result up, and multiply those two motif counts. Recalculate yarn from your swatch.
11. Blue-and-Rust Granny Sofa Throw
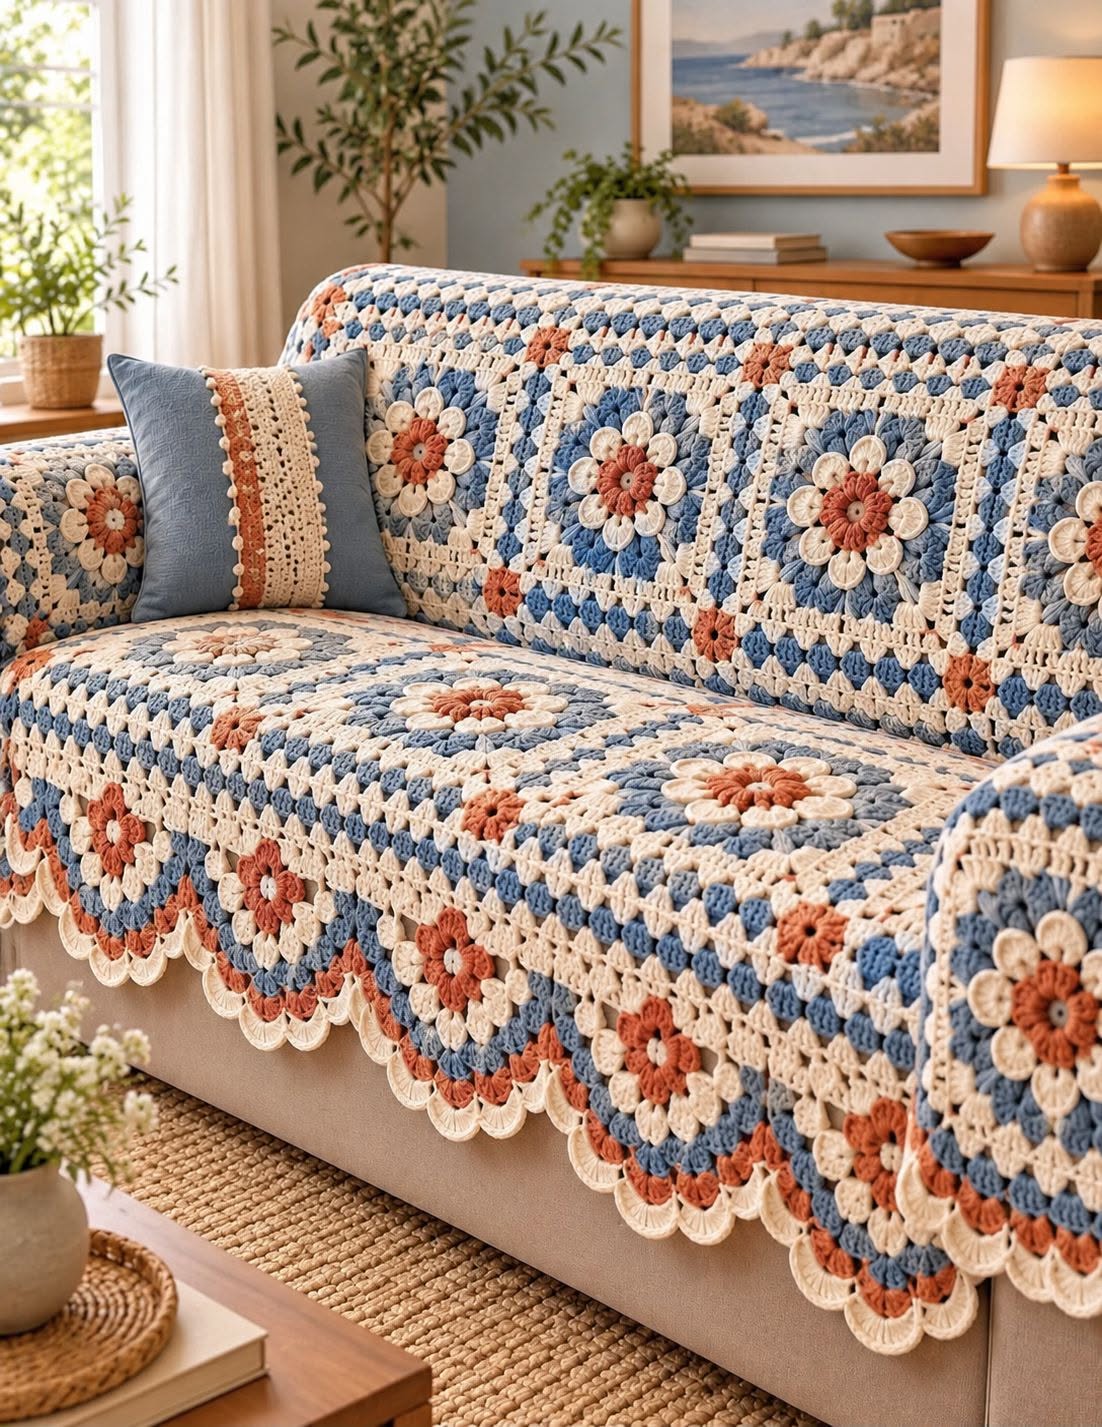
Color and texture inspiration: denim blue, rust, cream and gold. Alternate rust and blue centers with cream petals and a denim frame.
Materials, gauge and size
DK or light-worsted yarn, approximately 1,200–2,500 g for the throw body; optional pillow fronts need extra yarn. Colors: denim blue, rust, cream and gold. These are planning estimates, not measured yarn requirements. Use the yarn label’s meterage and a weighed swatch to buy enough of each color.
Hook: 4 mm. Also use a yarn needle, scissors, stitch markers, measuring tape and rustproof blocking pins.
Gauge and size: one blocked five-round square should measure about 12 × 12 cm; adjust hook or yarn to reach that size.
Project plan
Make 96 squares and join 8 × 12; make two optional 4 × 4-square cushion fronts.
Floral square — make the quantity in the layout
- Round 1: Make a magic ring. Ch 1 (does not count), work 12 sc into the ring; tighten and join with a sl st to the first sc. [12 sc]
- Round 2: Join the petal color. In each sc work (sc, ch 3, dc, ch 3, sl st), then move directly to the next sc. Join to the first sc. [12 petals; 12 sc, 12 dc, 24 ch-3 spaces, 12 sl sts] Do not work into the petal stitches next round.
- Round 3: With the framing color behind the petals, work 1 sc around each Round-1 sc post, ch 3 after each sc; join. [12 sc, 12 ch-3 spaces] Keep all petals on the right side.
- Round 4: Sl st into the first ch-3 space. In that space work (3 dc, ch 2, 3 dc); work 3 dc in each of the next two spaces. Repeat that sequence three more times; join. [48 dc, four ch-2 corners; four 3-dc groups per side when corner halves are included]
- Round 5: Ch 1, sc in each dc; in each corner space work (sc, ch 2, sc); join. [56 sc, four ch-2 corners; 14 sc along each side between corner spaces] Fasten off. Block to a square without stretching the petals.
Layout, joining and finishing
Make 96 squares and join 8 × 12; make two optional 4 × 4-square cushion fronts.
- Lay out all squares with their right sides up. Count the full grid before joining. Keep each square oriented the same way unless a deliberate rotated color arrangement is planned.
- With right sides facing, whipstitch corresponding outer loops along each side, matching all edge stitches and both corner spaces. Keep the seam relaxed. Join every row horizontally, then join the rows vertically. At a four-square intersection, take one securing stitch through the corner loops without pulling a hole open.
- For each optional cushion front, join 16 squares in a 4 × 4 grid. Sew the blocked front onto a washable fabric cushion cover with small running stitches around all four edges; keep its existing closure accessible. Use a fabric backing rather than assuming an open crochet front will hold stuffing.
- Join the border color in a corner. Sc in every edge stitch; work (sc, ch 2, sc) in each outside corner. At a seam, work through both adjoining loops once, without doubling up stitches.
- Work one more sc round, keeping each outside corner as (sc, ch 2, sc). For an optional shell round, along each straight side repeat: skip 1 sc, 5 dc in next sc, skip 1 sc, sl st in next sc. Use plain sc for any one to three leftover stitches before a corner; work (sc, ch 2, sc) in the corner. Do not force a shell across a seam or corner.
- Weave each end in three directions for at least 7 cm. Wet-block flat to the planned measurements, allow to dry completely, then check all seams. Wash a sample first; follow the yarn label.
Fit check: the stated body is a throw-size interpretation, not a promise of full bed or sofa coverage. To enlarge, measure the required width and length, divide each by the blocked motif width, round each result up, and multiply those two motif counts. Recalculate yarn from your swatch.
12. Blue-and-Cream Shell Stripe Blanket
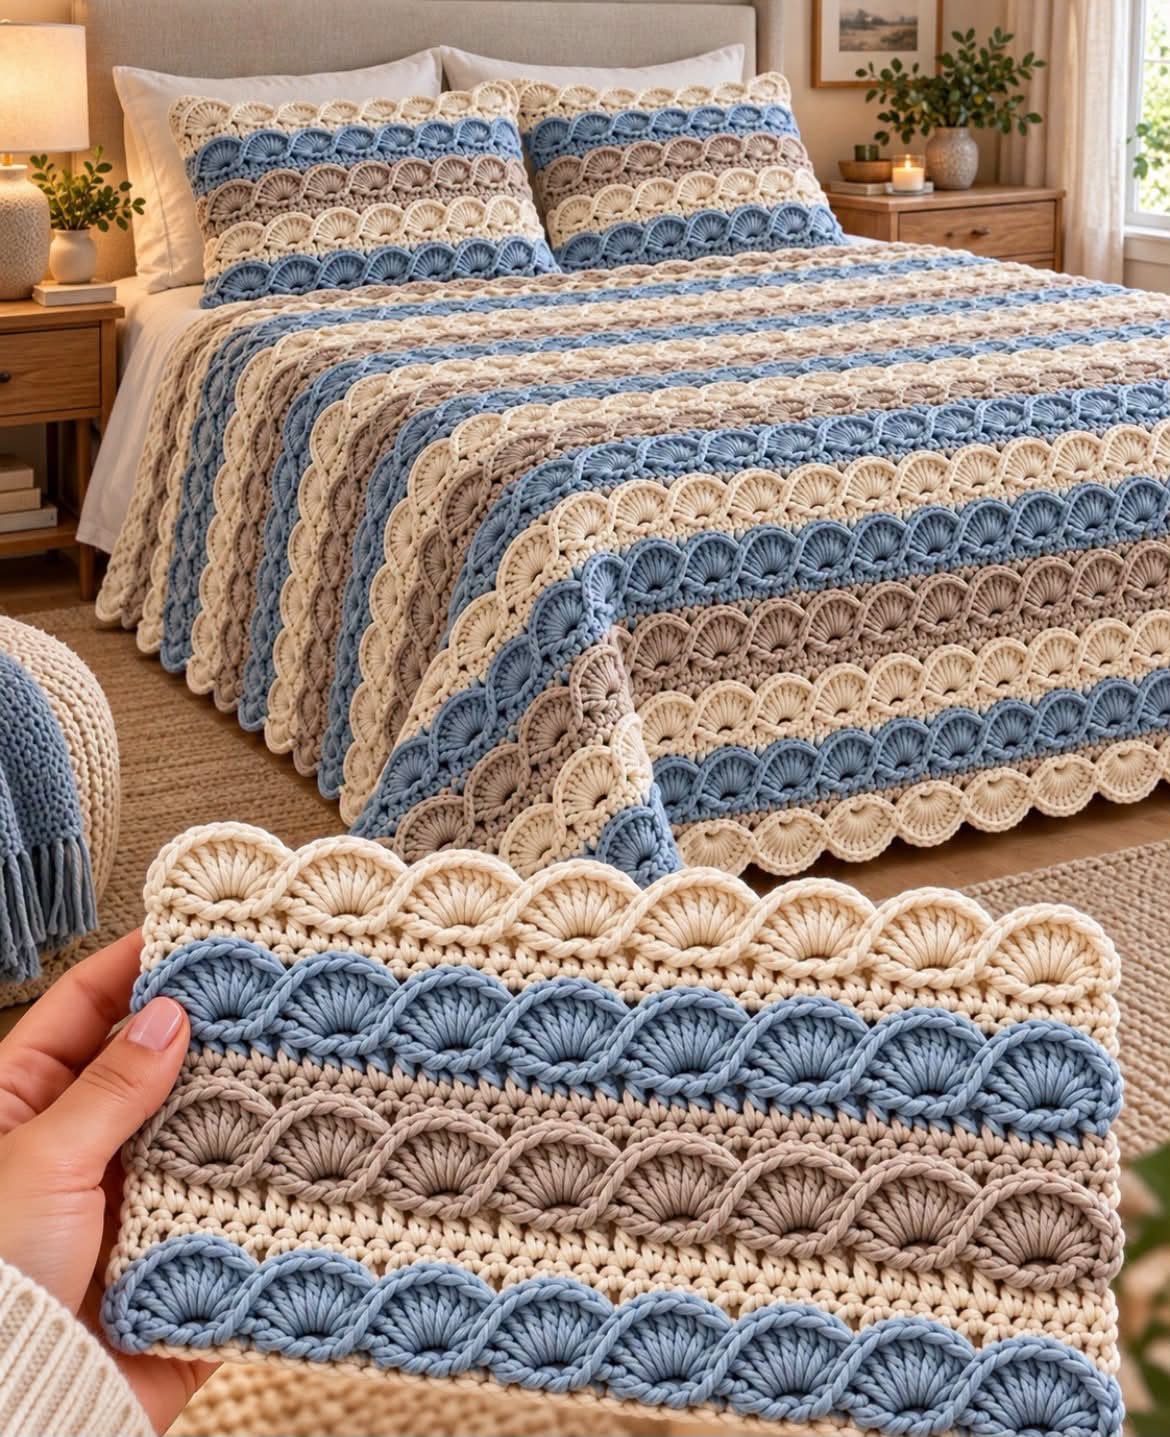
Color and texture inspiration: denim blue, cream and tan. For a larger cover, add foundation stitches in multiples of six and repeat rows to your measured length.
Materials, gauge and size
DK or light-worsted yarn, approximately 1,200–2,500 g for the throw body; optional pillow fronts need extra yarn. Colors: denim blue, cream and tan. These are planning estimates, not measured yarn requirements. Use the yarn label’s meterage and a weighed swatch to buy enough of each color.
Hook: 4 mm. Also use a yarn needle, scissors, stitch markers, measuring tape and rustproof blocking pins.
Gauge and size: 16 stitches × 10 pattern rows = approximately 10 cm; wash a full shell-repeat swatch before estimating finished dimensions.
Project plan
Make a 120-stitch foundation and work 120 pattern rows; at 16 stitches × 10 rows per 10 cm, the body is about 75 × 120 cm.
Striped shell blanket
- Ch 121. Row 1: Sc in second chain and across. [120 sc]
- Row 2: Ch 1, turn; repeat (sc in next stitch, skip 2, 5 dc in next stitch, skip 2) 20 times. [20 sc, 20 shells; 120 stitches]
- Row 3: Ch 3 (counts as dc), turn; dc in each remaining stitch. [120 dc]
- Row 4: Ch 1, turn; sc in every stitch. [120 sc]
- Repeat Rows 2–4 until there are 120 rows total; Row 120 is a dc row. Change colors at the end of a row, repeating this six-row stripe cycle: blue for three rows, cream for two, tan for one. Cut unused colors and weave ends rather than carrying long floats.
- Border Round 1: sc across the top and bottom; along the sides work 1 sc per sc row-end and 2 sc per dc/shell row-end. Place 3 sc at each corner. Round 2: sc around, with 3 sc in the middle stitch of each corner.
- Finish with a shell edge: skip 1, 5 dc in next stitch, skip 1, sl st in next stitch. At corners, use sc to fit the repeat without stretching. Wash and block to the actual swatch-based size.
13. Navy Floral Sofa Throw
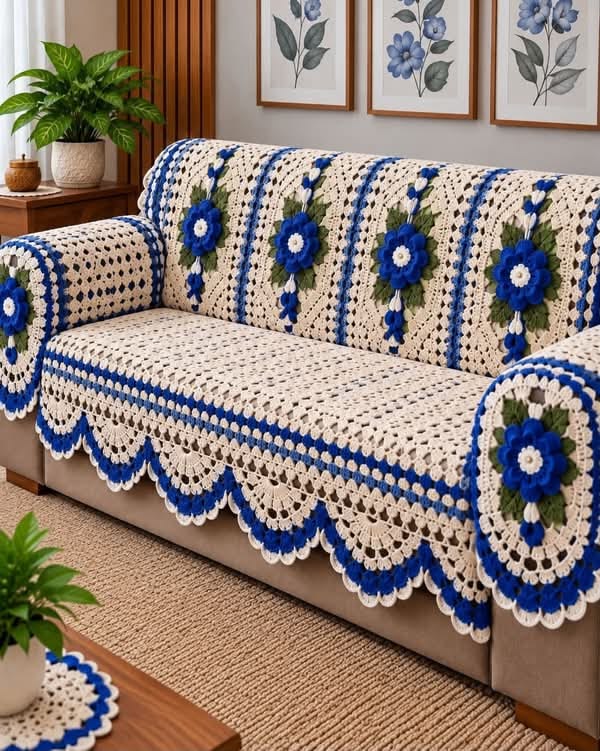
Color and texture inspiration: navy, ivory and medium blue. Use navy centers, ivory petals and blue frames with a navy outer edge.
Materials, gauge and size
DK or light-worsted yarn, approximately 1,200–2,500 g for the throw body; optional pillow fronts need extra yarn. Colors: navy, ivory and medium blue. These are planning estimates, not measured yarn requirements. Use the yarn label’s meterage and a weighed swatch to buy enough of each color.
Hook: 4 mm. Also use a yarn needle, scissors, stitch markers, measuring tape and rustproof blocking pins.
Gauge and size: one blocked five-round square should measure about 12 × 12 cm; adjust hook or yarn to reach that size.
Project plan
Make 96 floral squares, arranged 8 × 12. Make two optional 4 × 4-square cushion fronts.
Floral square — make the quantity in the layout
- Round 1: Make a magic ring. Ch 1 (does not count), work 12 sc into the ring; tighten and join with a sl st to the first sc. [12 sc]
- Round 2: Join the petal color. In each sc work (sc, ch 3, dc, ch 3, sl st), then move directly to the next sc. Join to the first sc. [12 petals; 12 sc, 12 dc, 24 ch-3 spaces, 12 sl sts] Do not work into the petal stitches next round.
- Round 3: With the framing color behind the petals, work 1 sc around each Round-1 sc post, ch 3 after each sc; join. [12 sc, 12 ch-3 spaces] Keep all petals on the right side.
- Round 4: Sl st into the first ch-3 space. In that space work (3 dc, ch 2, 3 dc); work 3 dc in each of the next two spaces. Repeat that sequence three more times; join. [48 dc, four ch-2 corners; four 3-dc groups per side when corner halves are included]
- Round 5: Ch 1, sc in each dc; in each corner space work (sc, ch 2, sc); join. [56 sc, four ch-2 corners; 14 sc along each side between corner spaces] Fasten off. Block to a square without stretching the petals.
Layout, joining and finishing
Make 96 floral squares, arranged 8 × 12. Make two optional 4 × 4-square cushion fronts.
- Lay out all squares with their right sides up. Count the full grid before joining. Keep each square oriented the same way unless a deliberate rotated color arrangement is planned.
- With right sides facing, whipstitch corresponding outer loops along each side, matching all edge stitches and both corner spaces. Keep the seam relaxed. Join every row horizontally, then join the rows vertically. At a four-square intersection, take one securing stitch through the corner loops without pulling a hole open.
- For each optional cushion front, join 16 squares in a 4 × 4 grid. Sew the blocked front onto a washable fabric cushion cover with small running stitches around all four edges; keep its existing closure accessible. Use a fabric backing rather than assuming an open crochet front will hold stuffing.
- Join the border color in a corner. Sc in every edge stitch; work (sc, ch 2, sc) in each outside corner. At a seam, work through both adjoining loops once, without doubling up stitches.
- Work one more sc round, keeping each outside corner as (sc, ch 2, sc). For an optional shell round, along each straight side repeat: skip 1 sc, 5 dc in next sc, skip 1 sc, sl st in next sc. Use plain sc for any one to three leftover stitches before a corner; work (sc, ch 2, sc) in the corner. Do not force a shell across a seam or corner.
- Weave each end in three directions for at least 7 cm. Wet-block flat to the planned measurements, allow to dry completely, then check all seams. Wash a sample first; follow the yarn label.
Fit check: the stated body is a throw-size interpretation, not a promise of full bed or sofa coverage. To enlarge, measure the required width and length, divide each by the blocked motif width, round each result up, and multiply those two motif counts. Recalculate yarn from your swatch.
14. Orange Daisy Bedspread
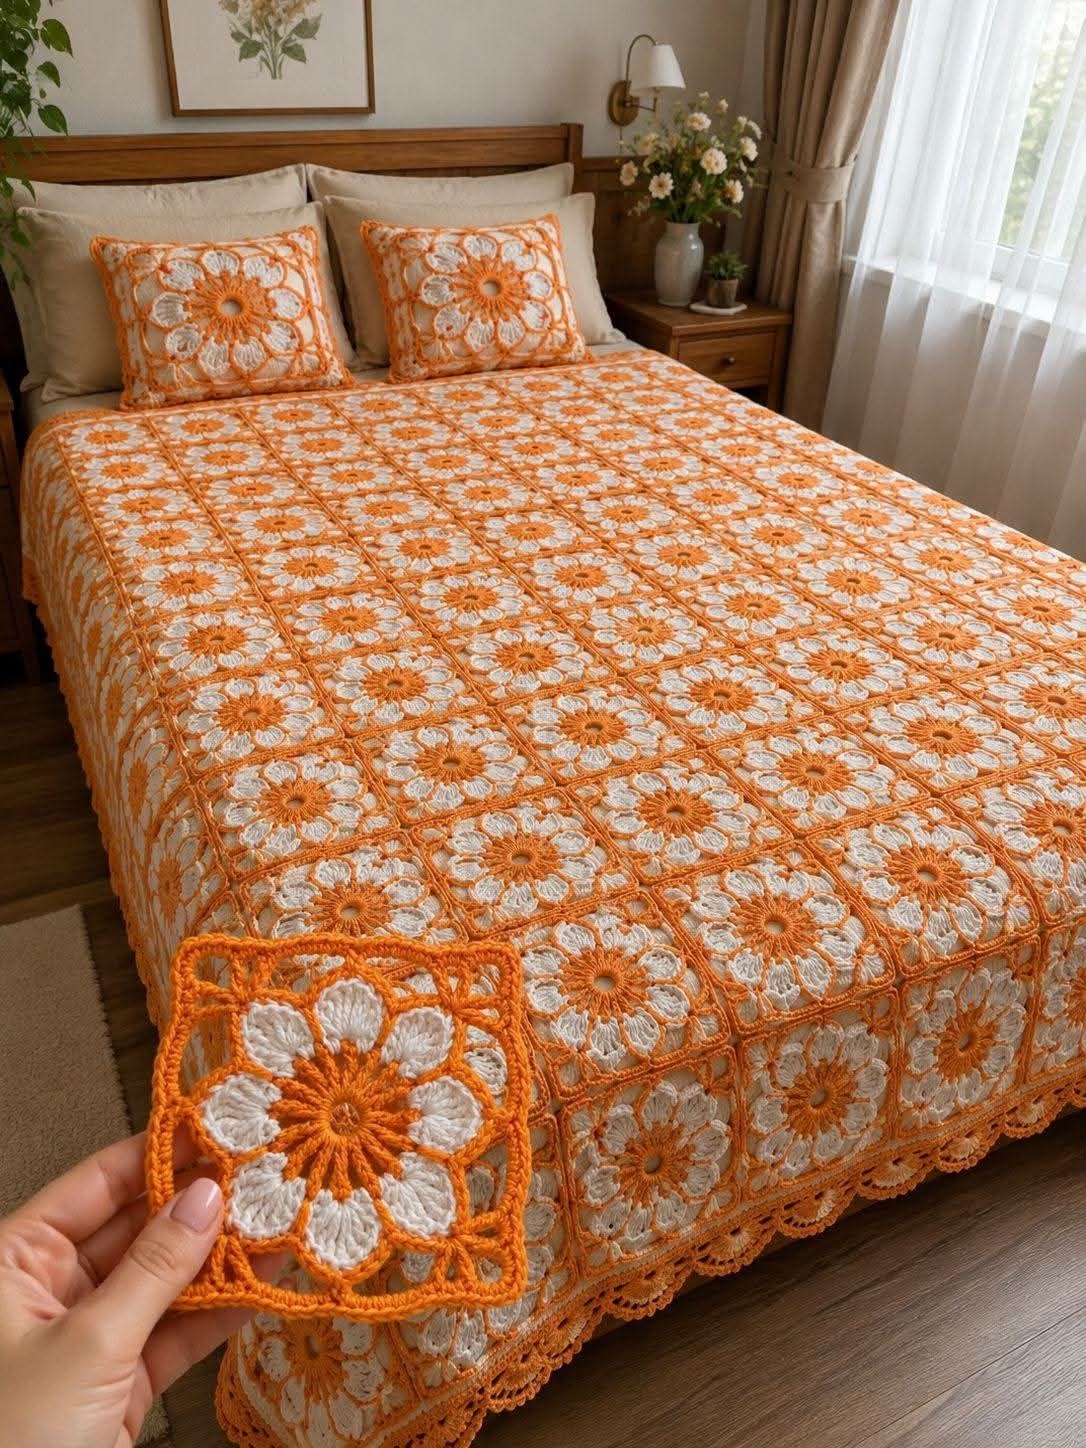
Color and texture inspiration: orange, white and pale peach. Use white centers, orange petals and pale-peach frames; alternate two shades of orange if available.
Materials, gauge and size
DK or light-worsted yarn, approximately 1,200–2,500 g for the throw body; optional pillow fronts need extra yarn. Colors: orange, white and pale peach. These are planning estimates, not measured yarn requirements. Use the yarn label’s meterage and a weighed swatch to buy enough of each color.
Hook: 4 mm. Also use a yarn needle, scissors, stitch markers, measuring tape and rustproof blocking pins.
Gauge and size: one blocked five-round square should measure about 12 × 12 cm; adjust hook or yarn to reach that size.
Project plan
Make 120 floral squares and join 10 × 12 for a 120 × 144 cm body at the stated motif size.
Floral square — make the quantity in the layout
- Round 1: Make a magic ring. Ch 1 (does not count), work 12 sc into the ring; tighten and join with a sl st to the first sc. [12 sc]
- Round 2: Join the petal color. In each sc work (sc, ch 3, dc, ch 3, sl st), then move directly to the next sc. Join to the first sc. [12 petals; 12 sc, 12 dc, 24 ch-3 spaces, 12 sl sts] Do not work into the petal stitches next round.
- Round 3: With the framing color behind the petals, work 1 sc around each Round-1 sc post, ch 3 after each sc; join. [12 sc, 12 ch-3 spaces] Keep all petals on the right side.
- Round 4: Sl st into the first ch-3 space. In that space work (3 dc, ch 2, 3 dc); work 3 dc in each of the next two spaces. Repeat that sequence three more times; join. [48 dc, four ch-2 corners; four 3-dc groups per side when corner halves are included]
- Round 5: Ch 1, sc in each dc; in each corner space work (sc, ch 2, sc); join. [56 sc, four ch-2 corners; 14 sc along each side between corner spaces] Fasten off. Block to a square without stretching the petals.
Layout, joining and finishing
Make 120 floral squares and join 10 × 12 for a 120 × 144 cm body at the stated motif size.
- Lay out all squares with their right sides up. Count the full grid before joining. Keep each square oriented the same way unless a deliberate rotated color arrangement is planned.
- With right sides facing, whipstitch corresponding outer loops along each side, matching all edge stitches and both corner spaces. Keep the seam relaxed. Join every row horizontally, then join the rows vertically. At a four-square intersection, take one securing stitch through the corner loops without pulling a hole open.
- For each optional cushion front, join 16 squares in a 4 × 4 grid. Sew the blocked front onto a washable fabric cushion cover with small running stitches around all four edges; keep its existing closure accessible. Use a fabric backing rather than assuming an open crochet front will hold stuffing.
- Join the border color in a corner. Sc in every edge stitch; work (sc, ch 2, sc) in each outside corner. At a seam, work through both adjoining loops once, without doubling up stitches.
- Work one more sc round, keeping each outside corner as (sc, ch 2, sc). For an optional shell round, along each straight side repeat: skip 1 sc, 5 dc in next sc, skip 1 sc, sl st in next sc. Use plain sc for any one to three leftover stitches before a corner; work (sc, ch 2, sc) in the corner. Do not force a shell across a seam or corner.
- Weave each end in three directions for at least 7 cm. Wet-block flat to the planned measurements, allow to dry completely, then check all seams. Wash a sample first; follow the yarn label.
Fit check: the stated body is a throw-size interpretation, not a promise of full bed or sofa coverage. To enlarge, measure the required width and length, divide each by the blocked motif width, round each result up, and multiply those two motif counts. Recalculate yarn from your swatch.
15. Blue Floral Granny Bed Cover
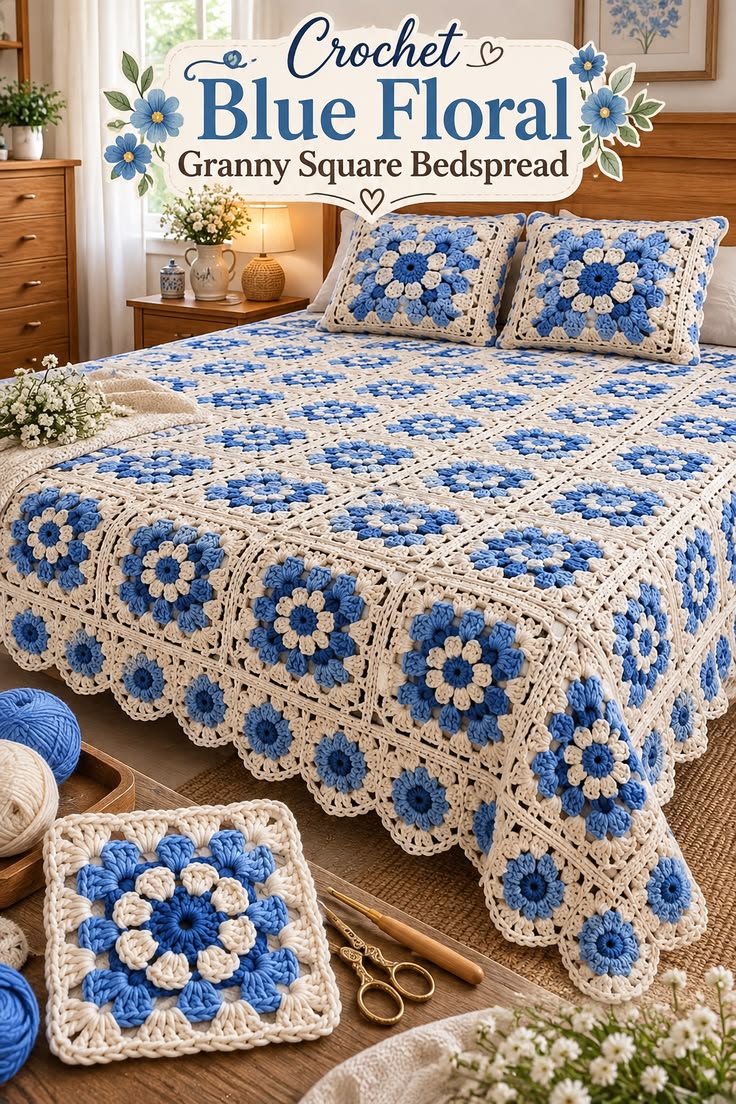
Color and texture inspiration: royal blue, cream and pale blue. Use royal-blue centers, cream petals and pale-blue frames.
Materials, gauge and size
DK or light-worsted yarn, approximately 1,200–2,500 g for the throw body; optional pillow fronts need extra yarn. Colors: royal blue, cream and pale blue. These are planning estimates, not measured yarn requirements. Use the yarn label’s meterage and a weighed swatch to buy enough of each color.
Hook: 4 mm. Also use a yarn needle, scissors, stitch markers, measuring tape and rustproof blocking pins.
Gauge and size: one blocked five-round square should measure about 12 × 12 cm; adjust hook or yarn to reach that size.
Project plan
Make 120 squares and join 10 × 12; make two optional 4 × 4-square pillow fronts.
Floral square — make the quantity in the layout
- Round 1: Make a magic ring. Ch 1 (does not count), work 12 sc into the ring; tighten and join with a sl st to the first sc. [12 sc]
- Round 2: Join the petal color. In each sc work (sc, ch 3, dc, ch 3, sl st), then move directly to the next sc. Join to the first sc. [12 petals; 12 sc, 12 dc, 24 ch-3 spaces, 12 sl sts] Do not work into the petal stitches next round.
- Round 3: With the framing color behind the petals, work 1 sc around each Round-1 sc post, ch 3 after each sc; join. [12 sc, 12 ch-3 spaces] Keep all petals on the right side.
- Round 4: Sl st into the first ch-3 space. In that space work (3 dc, ch 2, 3 dc); work 3 dc in each of the next two spaces. Repeat that sequence three more times; join. [48 dc, four ch-2 corners; four 3-dc groups per side when corner halves are included]
- Round 5: Ch 1, sc in each dc; in each corner space work (sc, ch 2, sc); join. [56 sc, four ch-2 corners; 14 sc along each side between corner spaces] Fasten off. Block to a square without stretching the petals.
Layout, joining and finishing
Make 120 squares and join 10 × 12; make two optional 4 × 4-square pillow fronts.
- Lay out all squares with their right sides up. Count the full grid before joining. Keep each square oriented the same way unless a deliberate rotated color arrangement is planned.
- With right sides facing, whipstitch corresponding outer loops along each side, matching all edge stitches and both corner spaces. Keep the seam relaxed. Join every row horizontally, then join the rows vertically. At a four-square intersection, take one securing stitch through the corner loops without pulling a hole open.
- For each optional cushion front, join 16 squares in a 4 × 4 grid. Sew the blocked front onto a washable fabric cushion cover with small running stitches around all four edges; keep its existing closure accessible. Use a fabric backing rather than assuming an open crochet front will hold stuffing.
- Join the border color in a corner. Sc in every edge stitch; work (sc, ch 2, sc) in each outside corner. At a seam, work through both adjoining loops once, without doubling up stitches.
- Work one more sc round, keeping each outside corner as (sc, ch 2, sc). For an optional shell round, along each straight side repeat: skip 1 sc, 5 dc in next sc, skip 1 sc, sl st in next sc. Use plain sc for any one to three leftover stitches before a corner; work (sc, ch 2, sc) in the corner. Do not force a shell across a seam or corner.
- Weave each end in three directions for at least 7 cm. Wet-block flat to the planned measurements, allow to dry completely, then check all seams. Wash a sample first; follow the yarn label.
Fit check: the stated body is a throw-size interpretation, not a promise of full bed or sofa coverage. To enlarge, measure the required width and length, divide each by the blocked motif width, round each result up, and multiply those two motif counts. Recalculate yarn from your swatch.
Before you use your finished crochet
Recount the work before joining large panels, reinforce point connections and weave every end securely. Follow the yarn label for washing and test colorfastness. Block the complete piece only after checking the intended placement and measurements. Photograph your swatch and note any changes so matching pieces can be repeated consistently.